
Early in my hacking journey, I decided to hack my WiFi. At the time, the only thing I knew about networks was what to do if my WiFi wasn’t working– unplug the round cord from the little black box in my living room, wait ten seconds, and then plug it back in.
I discovered that you could hack your WiFi while knowing almost nothing about networking. The only tricky part was finding a guide that worked. Guides I found lacked key instructions, were made for more advanced hackers, or were written in Mandarin.
So, I decided to make my own step-by-step WiFi hacking guide to teach someone with no technical experience how to hack their WiFi.
Want to skip around? Go ahead.
- Important Notes
- Necessary Installations
- Executing the Attack
- How do I protect myself from attacks like this?
- References
Important Notes
- This attack is real. Doing this anywhere other than your home network without consent is illegal. Resist the dark side.
- Instructions in this guide only apply to Mac and Linux users. Sorry, Windows friends.
- This attack only works on certain types of networks and authentication schemes. It will work on most home networks that require a password for authentication. If you discover that your network is not vulnerable, you can watch our video walkthrough to see a successful attack.
- I created this guide for a project in ENGRC-3500 at Cornell University. The original extended version first appeared here and was co-authored by Henry Samuelson, Luca Koval, and Shihao Cao (LinkedIn, Website).
Necessary Installations
You must install a few programs to run the tools necessary for this attack.
Opening up Terminal
The terminal is a Command Line System that allows you to execute machine commands. Basically, it is a way for you to talk to your Mac. We are going to use the terminal during this entire attack. If that is intimidating, don’t worry. We will walk you through every step. To open up the Terminal:
1. Open the “Finder” application in the bottom left-hand corner of your Mac’s home screen.

2. Open the “Applications” folder.
3. Open the “Utilities” folder by clicking the dropdown arrow.
4. Double-click on the “Terminal” application.

Installing Tools
There are four tools we need to install. We will install the first tool through the App Store and use the terminal to install the others.
IMPORTANT: Any time one of these steps prompts you for a password, enter the password used to unlock your computer, and then hit enter. Your password will be hidden as you type.
Xcode Install
The first tool we need is Xcode. Xcode has software development tools that we will use to install future tools. If you already have Xcode installed, skip to the HomeBrew Install section below.
To install Xcode:
1. Navigate to the “Applications” folder described in the Opening up Terminal section.
2. Double-click the “App Store” icon to open the Apple App Store.
3. In the search bar, search for “Xcode.”

4. If you have not already installed Xcode, there will be a “Get” button next to the app icon. Click on this button and follow the prompts to install.
Installation Time: Depending on previous installations, Xcode could take over an hour to install. This is the longest installation and takes much longer than all other tools.
HomeBrew Install
The second tool we need to install is HomeBrew. HomeBrew is a package manager for Mac that will allow you to install the last tool we need. If you already have HomeBrew installed, skip to the HashCat Install section below.
To install HomeBrew:
1. Open the terminal as described in the Opening up Terminal section.
2. Copy and paste this command into the terminal:
ruby -e "$(curl -fsSL https://raw.githubusercontent.com/Homebrew/install/master/install)"3. Press enter to execute the command.
Installation Time: Five to twenty minutes.
HashCat Install
The last tool we need to install is HashCat. HashCat is a password-cracking tool we will use to crack the “password hash” that we will recover (more on that later). If you already have HashCat installed, you can click on the next page to begin Executing the Attack. We will install HashCat using HomeBrew from the terminal.
To install HashCat:
1. Open the terminal as described in the “Opening up Terminal” section.
2. Copy and paste this command into Terminal:
brew install hashcat 3. Press enter to execute the command.
Installation Time: Two to ten minutes.
Executing the Attack
Here we will walk you through every attack step and explain the technologies used. Make sure you have completed the necessary installations page before you begin.
IMPORTANT: All steps should execute instantly unless noted otherwise. Go through these instructions in order.
1) Downloading the wordlist
1. Open the terminal.
2. First, we will download a wordlist that we will use later. The wordlist, called RockYou.txt, is a list of 1.4 million common passwords. We will use this list to try and crack the password hash later in the attack. To download and unzip the file, copy and paste this command into Terminal and then press enter:
wget https://github.com/praetorian-inc/Hob0Rules/blob/master/wordlists/rockyou.txt.gz?raw=true -O rockyou.txt.gz && gunzip rockyou.txt.gz The output should look similar to this, but not necessarily identical. Make sure a “100%” is displayed somewhere in the terminal output.

Execution Time: Less than one minute
2) Network Recon
Our next goal is to learn the name of the WiFi router. We will do this by using a library called airport. Airport will allow us to determine both the WiFi name and the MAC address (the router’s unique identifier).
1. In Terminal, copy and paste this command to allow the airport binary to be recognized:
sudo ln -s /System/Library/PrivateFrameworks/Apple80211.framework/Versions/Current/Resources/airport /usr/local/bin/airport 2. If prompted, enter your password and hit enter.
3. Determine the name of the WiFi network you are trying to attack. You can find a list of WiFi names by clicking on the WiFi button in the upper right-hand corner of your home screen. For this example, we are attacking the “MySpectrumWifi4B-5G” network.
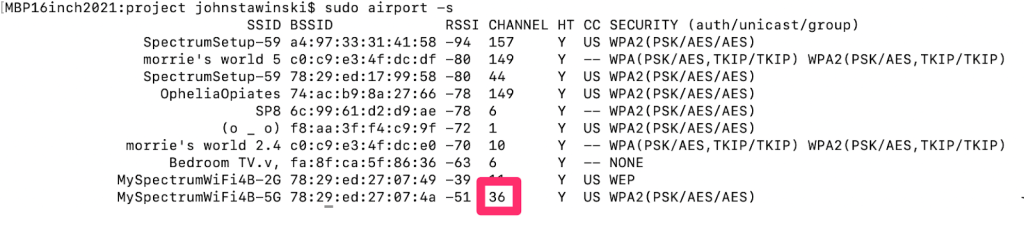
4. Use Mac’s network listening abilities to get more information about our target network. In Terminal, copy and paste this command:
sudo airport -s 
The output should look something like the figure above. If airport does not find any networks, repeat the previous step.
Execution Time: Instant
3) Set Environment Variables
We now need to store the router’s name so that we can impersonate the router later. Impersonating the router will let us intercept login requests when a new user connects. This request will contain the encrypted password.
From the output of the previous step, find the BSSID of the target network. This BSSID is the MAC Address of the WiFi router. It should look like the BSSID outlined in red in the screenshot below:

We will save the BSSID in an environment variable. To do this, copy and paste this command:
export BSSID=<TARGET_MAC_ADDRESS> In our example, we would run:
export BSSID=78:29:ed:27:07:4a
Verification
If the above command worked, you should now be able to run:
echo $BSSID
And see something like this:

Execution Time: Instant
4) More Recon
We will now use airport to disassociate from all networks. This will disconnect you from WiFi, so make you keep this guide open to look at future steps. To dissociate, run:
sudo airport -z Next, use airport to tell your machine to listen on the channel used by your target network. First, identify the channel from the output of the first step of the previous section Set Environment Variables:
Execution Time: Instant
5) Start Listening
Now that we have identified our target network, we will start eavesdropping. To do this, run:
sudo airport -c<target_channel> In our example, we would run:
sudo airport -c36 Now begin collecting packets using tcpdump. We will listen for a regular packet and then save that packet to a file called “beacon.cap.” Run:
sudo tcpdump "type mgt subtype beacon and ether src $BSSID" -I -c 1 -i en0 -w beacon.cap For the packet collection to work, users have to be connected to the target network [4]. If users are active, this command should complete quickly. The command is complete when the “packet captured line shows a number greater than zero:

Execution Time: Less than one minute if people are actively using the network.
6) Collect Packets
Once the last command is complete, we will start listening for any authentication packets. These packets get sent any time someone connects to the WiFi network. To listen for these packets, run:
sudo tcpdump "ether proto 0x888e and ether host $BSSID" -I -U -vvv -i en0 - w handshake.cap This command will not complete immediately, so wait and move on to the next step. When the command does terminate, it will save the authentication packet in a file called “handshake.cap.” Within this file will be the hash of the WiFi password that we will try to crack [7]. This hash is the encrypted WiFi password.

7) Wait For Reconnection
The last command will not terminate until someone connects to the network. This is where it gets fun. In a real attack, the attacker would lie in wait until someone connected. When doing this in your home, you can think of creative ways to convince your friends or family to disconnect and reconnect to the WiFi. Or, if your phone is connected to the network, you can just turn the WiFi off on your phone, then turn it back on and wait for it to reconnect. The second method is less cool though.
The hash capture is complete when the terminal output changes from “Got 0” to another number greater than zero.

After the packets have been captured, kill the process by going to the terminal and pressing the control key and the “C” key simultaneously. You can now reconnect to your WiFi.

Execution Time: This command will not terminate until someone authenticates to the target network.
8) Merge Captures
Now we have to merge the two capture files into one file called “capture.cap.” To do this run:
mergecap -a -F pcap -w capture.cap beacon.cap handshake.cap We must transfer “capture.cap” into a format our cracking tool hashcat can use to crack the password hash. To do this, we will use hcxpcapngtool with this command:
hcxpcapngtool -o capture.hc22000 handshake.capNote: if you cannot run hcxpcapngtool, try installing it with this command: brew install hcxtoolsYou can ignore any warning the hcxpcapngtool gives you, as long as you see this output at the end:

Execution Time: Less than two minutes.
9) Crack the Hash
Make sure that at least one cap file was processed as shown in the screenshot above. If not, go back to the “sudo tcpdump” step of Start Listening and try again. If this still does not work, confirm the outputs of the Wait for Reconnection and Collect Packets steps. If you still have issues, your WiFi authentication scheme is likely not vulnerable to this attack. Feel free to watch this video walkthrough to see what a successful attack looks like.
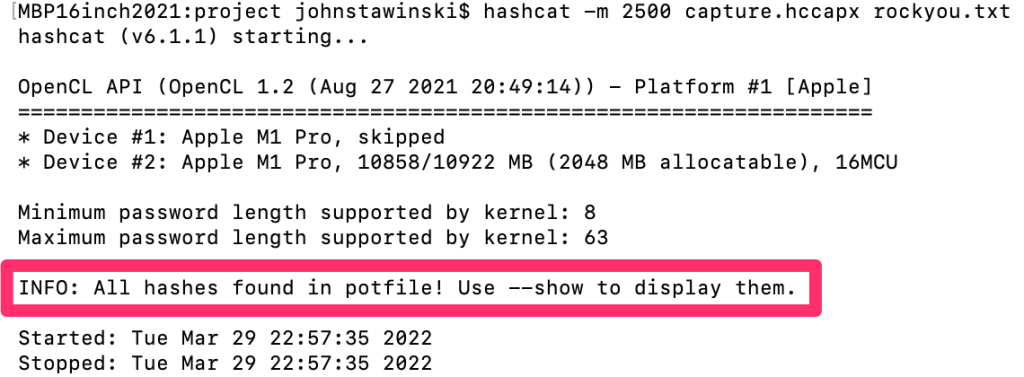
Once we have the hash file we will try to crack it using hashcat. “Cracking” a hash just means taking the hash and retrieving the encrypted password. To do this we are going to go through the entire list of 1.4 million passwords that we downloaded earlier, encrypt them, and see if they match the hash that we captured. If they match, we have cracked the WiFi password [8]! To begin this process, run:
hashcat -m 2500 capture.hc22000 rockyou.txt --deprecated-check-disableThis process could take up to five minutes (remember, it is trying 1.4 Million passwords). If successful, the result will look like this:
All that is left to do is to retrieve the password. Finally, run:
hashcat -m 2500 capture.hc22000 rockyou.txt --show 
You should now have the decrypted password as shown in the screenshot above.
Execution Time: Five to ten minutes.
10) What if my password didn’t get cracked?
If the password cracking step was unsuccessful, you have a decently secure password. Keep in mind, however, that we only used 1.4 Million passwords. A dedicated cracking rig could try over a billion passwords in a very short amount of time.
If your password wasn’t guessed, you can add your password to the wordlist and re-run the last few steps to see what a successful attack looks like. To do that, run:
echo <your_password> >> rockyou.txt Here <your_password> is the password of your target network. For example, if rewardbarrel058 was not on rockyou.txt , we would add it by running:
echo rewardbarrel058 >> rockyou.txtThis adds your password to the end of the rockyou.txt file and ensures that it will be one of the passwords guessed. Once you have added your password to the list, go back and follow the tutorial from Cracking The Hash, and the password hash should get cracked.
How do I protect myself from attacks like this?
It is scary how easy some attacks are. Here are some tips for protecting yourself from this attack and from other common hacking attempts.
Use complex passwords
Passwords like “123456” are easily cracked. Even longer common passwords, like “Summer2023!”, will be found on password wordlists like the one we used. If you think someone else would have the same password, then don’t use it.
In addition to the password “123456” being short, it only uses one type of character: numbers. A better password would include alpha and special characters as well.
And don’t just add an exclamation point to the end of your current password. Attackers know this trick. Vary your use of special characters. Throw one unexpectedly in the middle of your password. Replace a letter with a number that looks similar. Just make sure it is long, complex, and something that you can remember. A great password is useless if you can’t remember it.
Even with a secure password, it may still get compromised. A defense-in-depth solution to protect your accounts is MFA.
Enroll in Multi-Factor-Authentication (MFA)
MFA adds a second level of security by requiring additional authentication mechanisms. These mechanisms range from sending a code to your phone, to plugging in a physical USB key with a special cryptographic identifier. Using MFA, an attacker must compromise more than just your password, which makes your accounts safer. At the very least enable MFA on all your important identity and banking accounts.
Beware of Social Engineering
Some people will try to trick you into giving them your password. One popular way hackers do this is by pretending to be from a reputable company. They may call or email you claiming they need your username and password to fix something with your account. Do not trust them. They are trying to steal your password. It is always best to check these “issues” first on your own. If they truly exist, then you can contact the appropriate people to fix them.
Want to hear more? Subscribe to the official John IV newsletter to receive live, monthly updates of my interests and passions.
References
[1] “Cyber attacks becoming more frequent and severe, euro survey – Document – Gale OneFile: News,” PanARMENIAN.Net. 21, June, 2011. [Accessed Mar. 07, 2022].
[2] P. Tarwireyi, S. Flowerday, and A. Bayaga, “Information security competence test with regards to password management,” in 2011 Information Security for South Africa, Johannesburg, South Africa, Aug. 2011, pp. 1–7. doi: 10.1109/ISSA.2011.6027524.
[3] G. Delnevo, L. Deluigi, D. Evangelisti, and S. Magnani, “On increasing password security awareness using a serious game,” in 2022 IEEE 19th Annual Consumer Communications Networking Conference (CCNC), Jan. 2022, pp. 82–87. doi: 10.1109/CCNC49033.2022.9700539.
[4] H. S. Venter and J. H. P. Eloff, “Data packet intercepting on the internet: How and why? A closer look at existing data packet-intercepting tools,” Computers & Security, vol. 17, no. 8, pp. 683–692, Jan. 1998, doi: 10.1016/S0167-4048(98)80099-0. [Online]. Available:
https://www.sciencedirect.com/science/article/pii/S0167404898800990. [Accessed: Mar. 09, 2022]
[5] C. Ntantogian, S. Malliaros, and C. Xenakis, “Evaluation of password hashing schemes in open source web platforms,” Computers & Security, vol. 84, pp. 206–224, Jul. 2019, doi: 10.1016/j.cose.2019.03.011. [Online]. Available: https://www.sciencedirect.com/science/article/pii/S0167404818308332. [Accessed: Mar. 09, 2022]
[6] D. Nield, “How two-factor authentication keeps your accounts safe,” Wired, 12-Jul-2020. [Online]. Available: https://www.wired.com/story/protect-accounts-two-factor-authentication
[7] M. Agarwal, S. Biswas, and S. Nandi, “Detection of De-Authentication DoS Attacks in Wi-Fi Networks: A Machine Learning Approach,” in 2015 IEEE International Conference on Systems, Man, and Cybernetics, Oct. 2015, pp. 246–251, doi: 10.1109/SMC.2015.55.
[8] R. Hranický, L. Zobal, O. Ryšavý, and D. Kolář, “Distributed password cracking with BOINC and Hashcat,” Digital Investigation, vol. 30, pp. 161–172, Sep. 2019.
[9] T. Bell, “The importance of using different passwords,” ACUTEC, 02-Feb-2022. [Online]. Available: https://www.acutec.co.uk/blog/the-importance-of-using-different-passwords/. [Accessed: 28-Apr-2022].
[10] M. Burgess, “How to know if you’ve been hacked, and what to do about it,” Wired, 19-Jul-2020. [Online]. Available: https://www.wired.com/story/how-to-know-if-youve-been-hacked-and-what-to-do-about-it/. [Accessed: 28-Apr-2022].
[11] D. Arias, “Adding salt to hashing: A better way to store passwords,” Auth0, 25-Feb-2021. [Online]. Available: https://auth0.com/blog/adding-salt-to-hashing-a-better-way-to-store-passwords/. [Accessed: 27- Apr-2022].
[12] P. Navor, “The effects of password length and complexity on password resiliency,” University of Hawaiʻi – West Oʻahu, 01-Nov-2021. [Online]. Available: http://hdl.handle.net/10790/6830. [Accessed: 08- Mar-2022].

Leave a comment